Popcorn Sunday #02

If you want us to watch your short film simply leave it in the comments with a quick line about the film. We can't put them all in the videos but we comment on every single one with some constructive feedback!

Links to the short film can be found below - 

Dragonciego - Paloma by Matías Quiroga: https://vimeo.com/212278550

Memory Drive by Karl Bohn: https://youtu.be/Y87dDA42dpU


DISCLAIMERS:

Some of these links are affiliate links, if you purchase gear via these links The Film Look will receive a small commission, but there will be no additional cost to you. Thank you!

What to Buy after your Camera

Your camera is the single most important piece of equipment you need to make your film, but what do you need next.

So you’ve just bought your first camera, but that’s not the only piece of camera you need to make your film.

At the start there are so many pieces of camera equipment to look at it can be a little overwhelming. So we have put a list together of the top 5 things you should buy after your camera.

[Top down of camera equipment going on table white board]

50mm Lens

Canon 50mm F1.8

50mm is a really good looking focal length to shoot at, and most 50mm lenses will allow you to stop down to f1.8 if not lower.

This will allow you to achieve a shallow depth of field which always just looks good.

Try not to shoot eve  rything at F1.8 though, it can be difficult to keep everything is focus especially if your subject is moving.

I’d rather see your subject in focus then a completely shallow background, and F2.8 or F4 still can look good when using a 50mm lens.

Tripod

What to Buy after your Camera - Tripod.jpg

It sounds daft saying this but get a tripod, and try and get something that is going to last you a long time.

I bought this tripod about 5 years ago for about £150.

When I had a little spare money I upgraded the tripod fluid head to something that could take more weight and then added a leveling base to make using the tripod easier.

You can find tripods that cost £30, but you want something with a little weight and strength to it even if you are just using a DSLR side camera.

Get a good pair of legs which are going to last and you can always upgrade your head in  the future.

Slider

What to Buy after your Camera - Slider.jpg

A tripod will allow you to lock your camera down and help you think about the composition of your shots.

You can add movement with pans and tilts but if you want to add dynamic movement the next piece of camera equipment you could by is a slider.

Sliders will allow you to achieve shots like this: Slide from left to right revealing your subject. Slide from left to right whilst panning to keep your subject in the middle of the frame. You can push in. Push out. We have a video all about camera sliders if you want to learn more about them.

Mic

What to Buy after your Camera - Microphone.jpg

Video is nothing without sound and your cameras on board microphone just won't cut it, so get something like a Rode video microphone to start with as it will definitely improve your audio.

But to really improve your audio get the mic off your camera and as close to your subject as possible, if you get a Rode videomic get a 5 meter 3.5mm jack extension cable so you can still plug the mic into your camera.

Reflector

What to Buy after your Camera - Reflector.jpg

You can pick up a 5 in 1 reflector for less than £20 depending on the size you want.

We have a 110cm one and it is great to add a little more bounced light onto your subject with the white, silver or gold side.

The black side creates a negative fill so light will not bounce off it onto your subject. The middle section of the reflector will help you diffuse your light also.

Lights

Yes this is the six item on the list, but “top 6 things to buy after your camera” does not sounds as good.

Your camera's sensor needs light, at first start with just using daylight then move on to using lights and bulbs you have around in the house.

We recommend not to buy cheap work lights, the colour you get from them is not great and if you are planning on shooting videos for other people they don’t look very professional. 

You can get light fixtures like these which use household blubs, you can upgrade them in the future by add a can light attachment to help shape your light, then get different types of bulbs.  The edge/backlight on me right now is that light.

What to Buy after your Camera - Lights.jpg

When you need more light you can pick up a set of 3 800w lights that are dimmable, have light stands and come with a bag for £112.  We have had this set of lights for about 3 years and they work great.

You can also start with these £30 160 LED. The colour is not great from them but they work well as an edge light.

There are lots of over things you can buy to help shape or change the colour of the light, but buy them when you can.

This all might seem a lot but you don’t have to buy the model of equipment we have suggested, and you don’t even have to buy it brand new.

Filmmakers are constantly upgrading their kit and selling on there old kit which they have properly kept good care off.

So see if you can buy second hand and it will definitely save a little bit of money. 

This is the basic kit you need to shoot most things, so now you have it go out there shoot with it and tell stories until you feel you need more equipment to tell better stories.


This video was Sponsored By

http://bit.ly/illuminate-pack - RocketStock’s light leak pack, "Illuminate", is sure to impress your viewers. Shot using digital cinema cameras in 4K, it’s an unbeatable way to lift your video to new, cinematic heights.

https://bit.ly/track-easy-roller - Click here to download this episode's track. Check out Premiumbeat.com to discover a huge range of exclusive royalty free music!


Equipment Links

🎥 This episode's kit/gear/equipment:

US links:

Canon 50mm Lens: http://amzn.to/2wxSohj

Tripod Legs: http://amzn.to/2wGNHgz

Tripod Head: http://amzn.to/2wGXRh8

160 LED: http://amzn.to/2yqxEWg

800W Lights: http://amzn.to/2fjlJF3

Blub Holder: http://amzn.to/2yrdwTZ

Reflector: http://amzn.to/2jN6SUO

Rode Video Mic: http://amzn.to/2jMmtnh

3.5mm Extension Cable: http://amzn.to/2fiWMcv


UK links:

Canon 50mm Lens: http://amzn.to/2hh9F7E

Tripod Legs: http://amzn.to/2jN3zgm

Tripod Head: http://amzn.to/2jLiKX1

160 LED: http://amzn.to/2jLjyev

800W Lights: http://amzn.to/2w6Y3Xt

Blub Holder: http://amzn.to/2xhfKFd

Reflector: http://amzn.to/2hfMNFx

Rode Video Mic: http://amzn.to/2fBfTvy

3.5mm Extension Cable: http://amzn.to/2xwDO99


What to Buy after your Camera

DISCLAIMERS:

Some of these links are affiliate links, if you purchase gear via these links The Film Look will receive a small commission, but there will be no additional cost to you. Thank you!

Story in a Can #8 | "The Thieves Audition"

In each can there are 20 locations, 20 objects, 20 characters, and 20 scenarios. We pick one from each of the cans and try to come up with a film idea on the spot. Sometimes they are bad, but sometimes we turn the idea into a film.

In Story In a Can #9 Rob and Rich have to make a story about a Character who is a Bank Manager, a location of a Creepy Village, an object of someone else's wallet, and a scenario of Auddition?

Watch the video to see what story was made.


DISCLAIMERS:

Some of these links are affiliate links, if you purchase gear via these links The Film Look will receive a small commission, but there will be no additional cost to you. Thank you!

5 Tips for a better Script

Over the past 5 years or so I have dedicated some serious time into trying to write more interesting stories. So I thought I’d share with YOU my top 5 tips for a better screenplay.

Torture your characters

Torture-Your-Characters.jpg

One way you can push your script to the next level to “torture your characters”. We tend to write likeable characters in our films, which is great. But because of this, we might end up lacking commitment when giving them obstacles and struggles to overcome.

So don’t hold back! If you think you can push the action or drama even further, go for it. It’s all about going big or going home! You want to give them a situation they simply can’t avoid.

What would you rather watch:

  • Someone misplaces their car keys and has to walk home

  • Someone drops their car keys down the side of a cliff which they have to attempt to climb down using their pants belt because they are 200 miles from civilisation

Exposition

Exposition.jpg

Exposition, or the mass delivery of plot information, is usually unavoidable when writing a complex film. The trick to better exposition is having a character deliver information to an uninformed character rather than telling them something they already know.

It’s all about informing and educating instead of forcefully recapping on things they already have knowledge on.

CSI is a prime example of bad exposition. They’ll all be crowding around a crime scene and one dude will explain the situation to a team of professional detectives who will clearly know what’s going on.

A better example is Back to the Future. Doc Brown explains how time travel in the delorean works to Marty who, as a layman, currently has zero knowledge on this.

Show, don’t tell

Show-Dont-Tell.jpg

When you can, show - don’t tell. Dialogue should always be the icing on the cake! A scene should demonstrate what is happening, rather than a character’s dialogue telling us. Next time you are editing your script, try turning that line of dialogue into action instead.

For example: You could have the line “Jimmy’s got a big crush on Ashleigh but he’s too shy to ask her out”

Or instead, Jimmy could bump into Ashleigh at a party and simply can’t get a word out.

The output of information to the audience is the same, but one is a lot more visually entertaining.

Dream Fulfillment

Dream-Fulfilment.jpg

Dream Fulfillment. The characters in your film should be doing things you wish you could do. We all daydream about situations we know will never happen, but if you put pen to paper, your characters CAN act them out.

An audience will engage with a story if they are witnessing their dream being fulfilled on screen, so think about some of the quirky things you wish you could do, and write it into your film!

You have things like beating up the bully, spinning webs through new york city, and winning the race of a lifetime. But they don’t have to be good - you can write more sinister situations like graffiti the boss’s car, robbing a casino, or overthrowing the leader of a criminal organisation.

You can’t edit a blank page

You-Cant-edit-a-blank-Page.jpg

You can’t edit a blank page. Stop worrying if your first draft is total garbage! Stop hitting the delete key. Your first crack at a story is bound to be not so great. This is where the second draft comes in.

Get your words on the page and don’t look back until you’ve reached the end, then you can go back and clean it up. That’s why they call it a vomit draft.


This video was Sponsored By

http://bit.ly/interface-pack - "Interface", RocketStock's HUD element pack, offers you more than 400 futuristic elements compatible with Premiere Pro, FCPX, and AE. Discover it now!

https://bit.ly/track-blue-lounge - Click here to download this episode's track. Check out Premiumbeat.com to discover a huge range of exclusive royalty free music!


DISCLAIMERS:

Some of these links are affiliate links, if you purchase gear via these links The Film Look will receive a small commission, but there will be no additional cost to you. Thank you!

Our Podcast is LIVE!

We started a Podcast! It's called The Film Look (good name?) and can found on iTunes and many other Podcasting apps including your favourite Android apps. Go check it out!


Podcast: http://thefilmlook.co.uk/004-the-incredibles-reboots-remakes-sequels-and-prequels/


DISCLAIMERS:

Some of these links are affiliate links, if you purchase gear via these links The Film Look will receive a small commission, but there will be no additional cost to you. Thank you!

Filmmaker's Utility Pouch

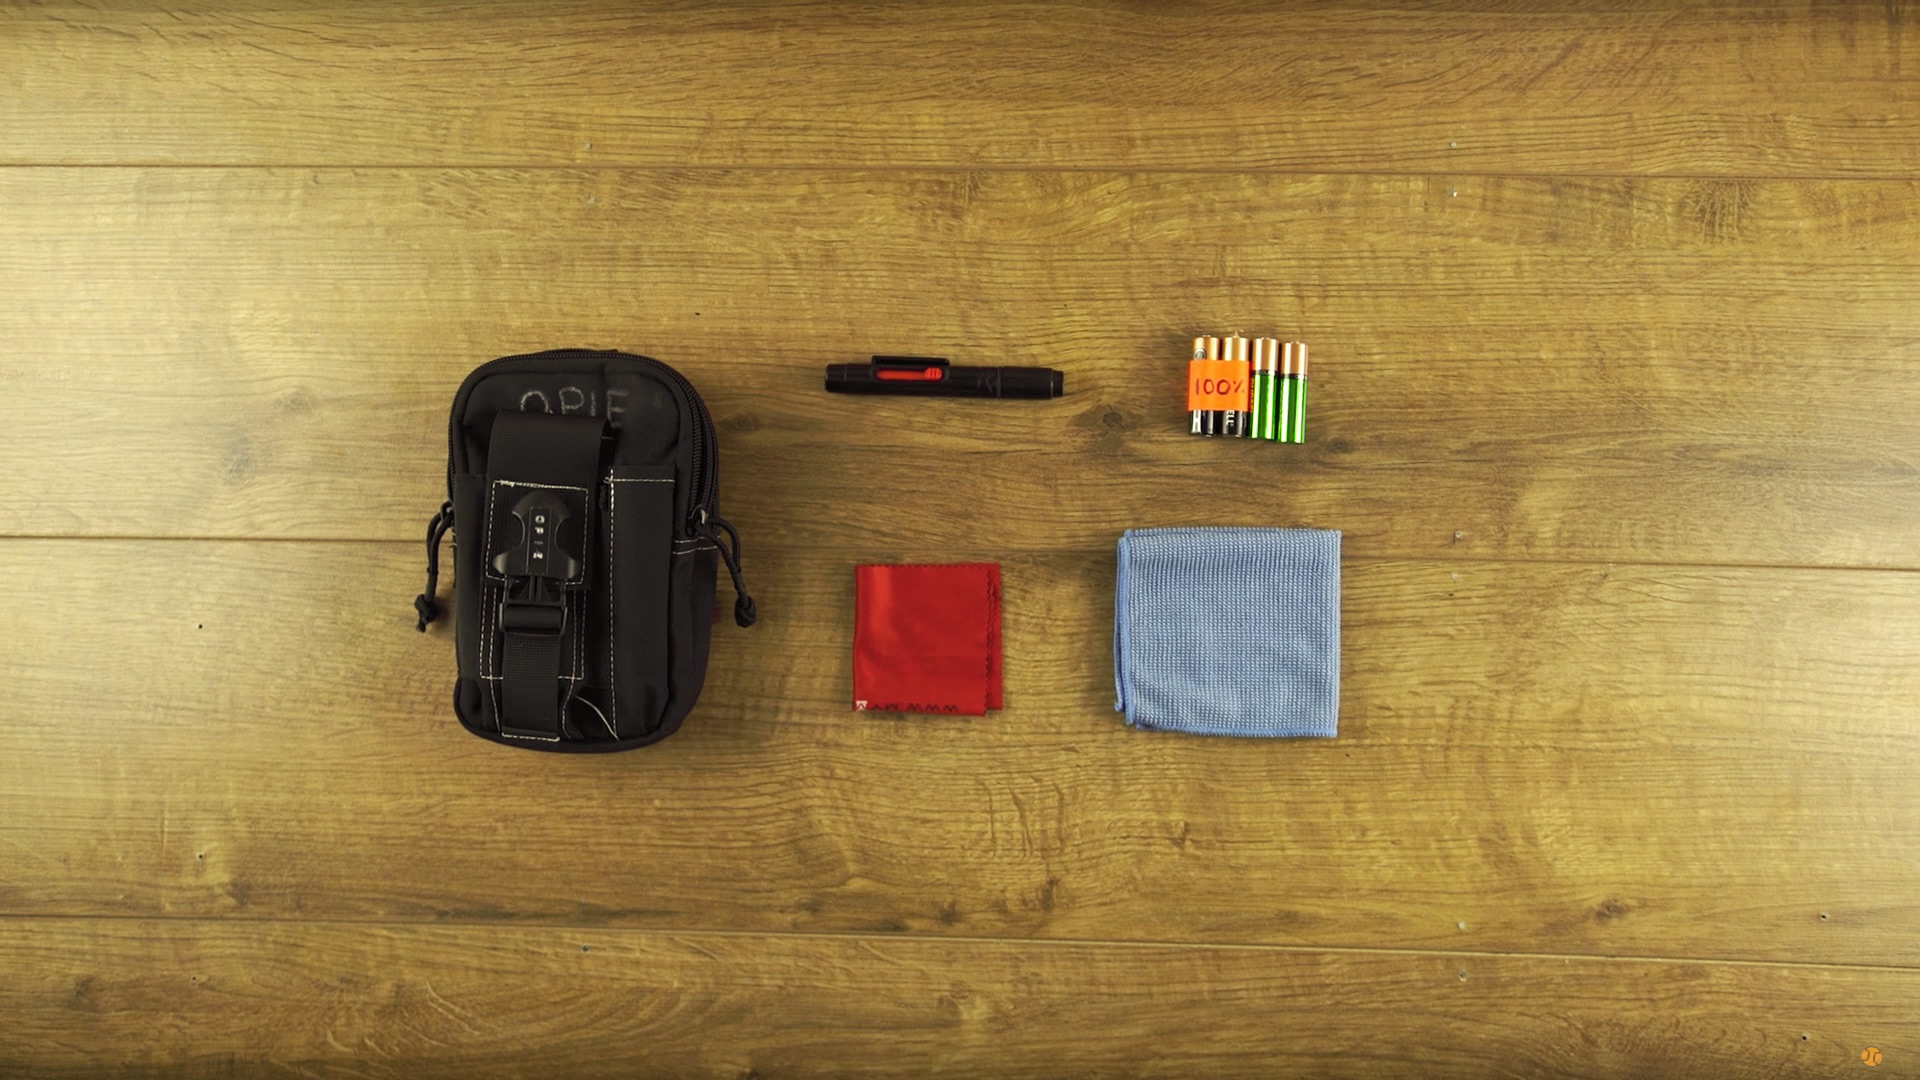
This is Adam Opie: Filmmaker, Camera Operator, & Glidecam Extraordinaire. He’s put together a filmmaker’s accessory kit which we think even Batman would be jealous of: This is the Filmmaker’s Utility Pouch

First off, you have the pouch itself: £13.98. 

  • This one is by OneTigris. It’s got pockets in pockets, outside buckles, and molle-style straps perfect for attaching to your belt.


Inside the front pouch you have filmmaking stationary:

  • A  cloth for cleaning monitors and screens

  • A lens pen, also for cleaning camera lenses

  • AA batteries for emergencies (these are labelled non-rechargeable at 100%)

  • And a lens cloth for cleaning lenses

Filmmaker's-Pouch2.jpg

Then you have the back pouch. Inside here we have:

  • A multitool used for tightening tripod plates, cutting things open, and emergencies such as removing over threaded screws.

  • A allen key tool for all of your allen key needs

  • A torch. This one zooms in. You can use this in dark situations and double checking the location after a wrapped shoot.

  • Business cards, because you never know when you need to take off your filmmaker hat and put on your business hat.

  • Velcro straps for cable management and emergency attachments.

Filmmaker's-Utility-Pouch1.jpg

On the outside we have:

  • Fingerless gloves: If you are doing a lot of outside shooting, especially in the winter, it’s always a good idea to protect your hands from the elements. These gloves by Dirty Rigger are fingerless for retained dexterity, and will assist your grip during camera operation and lifting equipment. They also have a hold at the wrist for clipping to the pouch.

  • Ear protection. Perfect for a loud shooting location such as a concert or gig. These ones by EarPeace even come in a handy canister

  • Radios, because you never know when you need to get in contact with someone beyond earshot. The antenna even fits in this pouch really tidy.

  • Some pens, because at some point someone will always ask “Any got a pen?”.

  • To attach everything to the outside of the pouch are some handy miniature screw gate carabiners.

  • And to finish it off, some spring clamps.

Filmmaker's-Pouch

Everything in and on this pouch, including the pouch itself, comes in at a total of £.

You might not need everything in this pouch so just get what you need when you need it.

In addition to the pouch, Adam has started putting together a 2nd AC’s utility belt including:

  • Miniature T marks made from t brackets and bright coloured tape. Great for outdoor use.

  • A slate, a dry wipe pen, and a microfiber for cleaning the slate.

  • An absolute shed load of assorted tape, held together with a rigging strap.

  • Heat resistant gloves for handling hot lights.

  • The belt also has a MOLLE strap system, which is a universal webbing system employed by thousands of container harnesses and belts. It also means that you can attach the utility pouch to the belt.

So if you want to be a walking swiss army knife, check out the shopping list Adam has put together in the description below. And if YOU have any suggestions for Adam and what he can add to his utility belt, leave us a comment or talk to him directly, I’ve put his social media links in the description too.


This video was Sponsored By

http://bit.ly/track-brooklyn-drive - Thanks to PremiumBeat for providing the music for this week's episode! Check out Premiumbeat.com to discover a huge range of exclusive royalty free music.


Equipment Links

🎥 This episode's kit/gear/equipment:

US links:

Pouch: http://amzn.to/2vwGOSZ

Fingerless Gloves: http://amzn.to/2xCur5r

Ear Protection: http://amzn.to/2vPDIor

Sharpies: http://amzn.to/2goF4ky

Ball Point Pens: http://amzn.to/2wsOXFe

Clamps: Carabiners: http://amzn.to/2euH3H0

Radios: http://amzn.to/2wozhVd

Lens Cleaning Kit: http://amzn.to/2xCCP4P

Rechargeable Batteries: http://amzn.to/2vPUunn Microfibre

Cloths: http://amzn.to/2goqv06

Multi-tool: http://amzn.to/2xCNyMI

Torch: http://amzn.to/2vQiKWI

Hey/Allen Key Tool: http://amzn.to/2wswk4B

Velcro Straps: http://amzn.to/2euCTPr

Belt: http://amzn.to/2wt5IAm

Heat Resistant Gloves: http://amzn.to/2euKopC

Rigging Strap: Unavailable in US? Weird! T Marks (just add tape!): http://amzn.to/2xD2Wc6


UK links:

Pouch: http://amzn.to/2goyqe6

Fingerless Gloves: http://amzn.to/2iL4tJD

Ear Protection: http://amzn.to/2xCyO0v

Sharpies: http://amzn.to/2eKfIgU

Ball Point Pens: http://amzn.to/2xCWdyS

Clamps: http://amzn.to/2gozCOC

Carabiners: http://amzn.to/2gocgJ0

Radios: http://amzn.to/2iNlAuo

Lens Cleaning Kit: http://amzn.to/2goECmn

Rechargeable Batteries: http://amzn.to/2gowrpW

Microfibre Cloths: http://amzn.to/2iNfCd3

Multi-tool: http://bit.ly/2wodgpq

Torch: http://amzn.to/2wsa9eU

Hey/Allen Key Tool: http://amzn.to/2gomIjp

Velcro Straps: http://amzn.to/2goyHO5

Belt: http://amzn.to/2goAsuE

Heat Resistant Gloves: http://amzn.to/2goeoAh

Rigging Strap: http://amzn.to/2iOyEzN

T Marks (just add tape!): http://amzn.to/2iMvMDp


Filmmaker's Utility Pouch

DISCLAIMERS:

Some of these links are affiliate links, if you purchase gear via these links The Film Look will receive a small commission, but there will be no additional cost to you. Thank you!

Popcorn Sunday #01

If you want us to watch your short film simply leave it in the comments with a quick line about the film. We can't put them all in the videos but we comment on every single one with some constructive feedback!

Links to the short film can be found below - 

Hindsight: https://youtu.be/6l7PSvxM2QQ

Ghastly Glasses: https://youtu.be/vt2lro7nKVQ

Regular people: https://youtu.be/h12i_zQkbDM


DISCLAIMERS:

Some of these links are affiliate links, if you purchase gear via these links The Film Look will receive a small commission, but there will be no additional cost to you. Thank you!

Raiders of the Lost Ark | How did it achieve the film look?

Raiders of the Lost Ark: It’s a classic action adventure film that I’m sure we all watched as kids.  It certainly has, what I would consider, The Film Look. There’s something about it, visually, audibly, and immersively, that screams “This is a great movie experience!”. But how does it achieve the film look? Let’s break it down! 


This video was Sponsored By

http://bit.ly/pack-emulsion - Make your video look like it was tailor-made for the silver screen with RocketStock’s film grain overlay pack, Emulsion!

http://bit.ly/pbtrack-links - Click here to download this episode's track. Check out Premiumbeat.com to discover a huge range of exclusive royalty free music!


DISCLAIMERS:

Some of these links are affiliate links, if you purchase gear via these links The Film Look will receive a small commission, but there will be no additional cost to you. Thank you!

How to light a Séance | Lighting Setup #3

We made this music video which had a seance scene and in this video we are going to show you how easy it was to set up.

A link to the music video can be found in the description below. Today we are going to recreate  that set-up. First we tried to set it up in our studio, but because of the lack of space we could not separate our subject from the background. So we found a better location at our friend’s flat which had a perfect layout.

To create the scene with the look we wanted, we placed a round table in the middle of the room with a red tablecloth, placed a chessboard on top of it and placed two chairs at an angle for our subjects. Then we started to set up the lights.

Key Light

The key light is the main room light. It uses an 80 watt bulb with a colour temperature of 2800 kelvin which is a very warm looking light. It was hanging 1.7 meters above the table, and by wrapping the lamp shade with the sleeve of a 5-in-1 reflector we were able to cast the light solely down onto the table. We wrapped it with the silver side on the inside to maximise the brightness of the bulb.

Lighting-Setup-3---Without-Reflector.jpg
Lighting-Setup-3---With-Reflector.jpg

Fill Light

There was not really a fill light in this scene. The red tablecloth did add some fill under the subject's face but it was very subtle. If you need more light for your subject you could change the tablecloth to white which will create more bounce from the light above.

Edge Light

To help set the mood of a Seance we used candles in the background which always look cool, especially when you are shooting at a low F-Stop. If you don’t what to use candles, fairy lights are a good alternative.

fairy-lights-lighting-a-film.jpg

Camera

The camera we used was a Sony A7s. For the close ups we used a 50mm lens set to F1.8 and for the two shot we used a 35mm lens which could only stop down to F3.5, so the ISO changed from 1000 on the 50mm to 5000 ISO on the 35mm lens.

The shutter was set to 1/50 and the colour temperature was set to 2700 kelvin making our key light white for our subjects, but making the candle light a little bit warmer to suit the scene.

In the music version of this set up we filmed it by using a technique called lens whacking which means disconnecting the lens from the camera which allows more light to hit your sensor from different angles. The reason we used this technique is because the location we shot in only had white walls which is not great to look at, lens whacking made the location look a little more interesting.

Here is the setup before, after, and what the final grade looked like.

How-to-light-a-Séance---Before.jpg
How-to-light-a-Séance---After.jpg

This video was Sponsored By

http://bit.ly/synergy-pack - Get professional assets for your video from RocketStock.com. Their "Synergy" video pack is perfect for video editors and animators looking for versatile elements for any type of project.

http://bit.ly/pbtrack-phenomenal - Click here to download this episode's track. Check out Premiumbeat.com to discover a huge range of exclusive royalty free music!


Equipment Links

🎥 This episode's kit/gear/equipment:

US links:

5-in-1 reflector: http://amzn.to/2wYzT5Q

Sony a7s: http://amzn.to/2wZ5gbv

Canon 50mm f/1.8: http://amzn.to/2xHAfMU

Takumar 35mm: http://amzn.to/2wYhmXt

UK links:

5-in-1 reflector: http://amzn.to/2fBrKNs

Sony a7s: http://amzn.to/2fBcsZ5

Canon 50mm f/1.8: http://amzn.to/2fBsH8q

Takumar 35mm: http://amzn.to/2fAYFSd


How to light a Séance
lumu-light-metre.jpg

DISCLAIMERS:

Some of these links are affiliate links, if you purchase gear via these links The Film Look will receive a small commission, but there will be no additional cost to you. Thank you!

How to Write Original Ideas

We sometimes find as writers that we aren't generating unique and original story lines or characters.

“Doc: Here we go, Marty. If my calculations are correct, when the car hits 88 miles an hour, you’re gonna see some serious shit.”

Well, how do we write with originality?How do we write with originality?

Let me show YOU one way that might work.

Sometimes we find ourselves writing things that are more comfortable than compelling which leads to unoriginal and predictability.

During these periods of low inspiration, the first, second, or even tenth thing we write down is comfortable and all too familiar.

”The van side door slides open and a SWARTHY CHARACTER who resembles Yasser Arafat leans out with an AK 47 sub machine gun. He OPENS FIRE. Brown: Run for it, Marty! I’ll draw their fire!

It’s likely going to be something we have heard or seen before, resulting in something boring or cliche. 

“This doesn’t make you a bad writer - it is just how our brains are wired.”

How-to-rob-a-bank-script.jpg

Our natural human instinct is to find comfort. This is why we find change so difficult at times. Well I’ve recently learned of a technique that I want to share with YOU that will push against that comfort by forcing ourselves into thinking deeper.

I’m going to try writing about a bank heist. How many different ways can we answer the question “How do they rob the bank?”.

  • Out of the car, masks on, through the front door with shotguns.  

This is 90% of heist movies, so it’s good we are getting this out of the way! Lets keep going!

  • Around the back, knocking out the security guard who is taking a secret smoking break.

  • Ramming a lorry straight through the lobby window and going in all guns blazing.

  • Hacking into the electronics at night, and robbing it under the stealth of total darkness.

  • Waiting patiently. As a bank teller opens the security door, throw a paper airplane doused in petrol through it. Using a remote spark, detonate it, causing a small fire. The fire alarms go off, releasing the locks so you can break in.

How-to-rob-a-bank-script1.jpg

Okay, now we’re getting somewhere. Thinking of more ideas from this point is going to get harder, and that’s a good thing! Lets keep going.

  • Drilling in from underneath the bank.

  • The heist team all get jobs at the bank and they rob it from the inside.

  • One of the team acts pregnant, her water breaks at the bank and must get to the hospital. But! Another member of the team backs a truck up to the doors and runs away. The manager, who can’t be dealing with this, brings the pregnant team member through the back. She knocks him out, steals his card, takes several piles of cash from safety deposit boxes, hides them in the hollow cavity of her fake pregnant belly, and escapes out of the front door via an “ambulance” which just conveniently happens to be...more members of the team.

That last one might not be the greatest of ideas, just yet. But developing the idea and changing a few things here and there, you might have yourself a compelling and unique spin on a common action movie convention.

This technique can work with any type of story, whether that be a piece of dialog in a diner, a morning montage, or being shouted at by your principal at school.

By forcing our brains to keep thinking of more and more versions of the same scenario, we find ourselves running out of comfortable solutions, and in turn, we find originality.

So next time you are struggling to write an original scenario for your screenplay, try writing a dozen and going with the last one.

In fact, here is a challenge! I want YOU to write 10 different ways a character is being yelled at by their boss, and put them down below! Let’s see what we can all come up with.


This video was Sponsored By

http://bit.ly/stanza-pack - Thanks to RocketStock for the video transitions used in this episode! With over 200 exclusive transitions, their pack Stanza can get your video looking great too.

http://bit.ly/track-FunkyMoments - Click here to download this episode's track. Check out Premiumbeat.com to discover a huge range of exclusive royalty free music!


How to Write Original Ideas

DISCLAIMERS:

Some of these links are affiliate links, if you purchase gear via these links The Film Look will receive a small commission, but there will be no additional cost to you. Thank you!

3D Printed Camera Equipment

Since this is the future and we can now 3D print things of all shapes and sizes, we wanted to see what camera equipment we could get printed.

Since we don’t have a 3D printer we headed over to our local FabLab.

There are loads of these all over the world so see if there is one near you.

If you are like us and don’t have a lot of experience in creating 3d models we used a website called Thingverse. On this website you can download 3D models for everything from phone cases, shoelaces, masks, and your favourite movie props.

we wanted to print camera related equipment, so we searched camera equipment on the site and these are the items we got 3D printed.

Mini Tripod

3D-Printed-Tripod.jpg

This mini tripod was the first thing we got 3D printed as it is crazy you can print such a thing. It comes in 5 different parts and you need to buy nut and bolts to secure all of the parts together, but they tell you on thingiverse which ones you need.

3d-printed-camera

To attach the tripod to the camera you need to use a standard quarter 20 screw like this one, or if you have a spare quick release plate like we did you can attach your camera using that.

The tripod can hold a DSLR sized camera with a lens and works great if you need to set up your camera for a static shot or even timelapse.

One of the best things about this tripod is that is folds down and does not take up much room in my camera bag.

Sony NP-FW50 Battery Holder

3d-printed-camera-equipment.jpg

The Sony A7 NP-FW50’s are really small and they don’t come with a case so it’s impossible to know which ones have been used, this is unlike our Canon 600d camera batteries.

But using this 3D printed battery clip you can store 4 of them together.

The way we store them is when the battery connector is facing outwards the battery is charged, then when a battery is flat they go in the other way, so you know how many you have left.

There is nothing out there you can buy that does the same job of storing these Sony batteries in this way, it has to be 3D printed.

Studio Battery Dispenser

3D-Printed--BatteryHolder.jpg

This studio battery dispenser is another way to store your batteries. This one stores double AA batteries but on Thingiverse you can also get the 3D models for triple A batteries, 12v batteries and many more.

We have found this to be really handy as it helps not to mix up flat batteries with your charged ones. This is another one of those items I have not seen for sale in a shop.

Battery Case

3D-Double-A-Battery-Holder.jpg

Just like the Sony A7s battery holders, these double A and Triple A battery holders have come in handy to store charged batteries in my camera bag. They no longer roll all over and I know if the batteries are facing down, they have been used. When you 3D print these you have to buy magnets to secure the lids on, which makes it quick and easy to store the batteries.

SD Cards Holder

3D-SD-Card-Holder.jpg

This is an SD card holder which allows you to store your SD cards obviously.

This is the only print I would not recommend as you can not see the front of the SD card so you have to search through them until you find the one you need.

There are many different SD card holders you can buy for a few pound, so just get one of those.

The quality of these 3D prints are really good, and I didn’t expect the plastic to be so tough and they are definitely going to last a long time.

We have been using the Sony A7s battery holder for about a year now and it still works great, and it is such an important item in my camera bag as it keeps the batteries for my main camera organised in such an easy way.

Being able to print the items in bright colours comes in really handy.

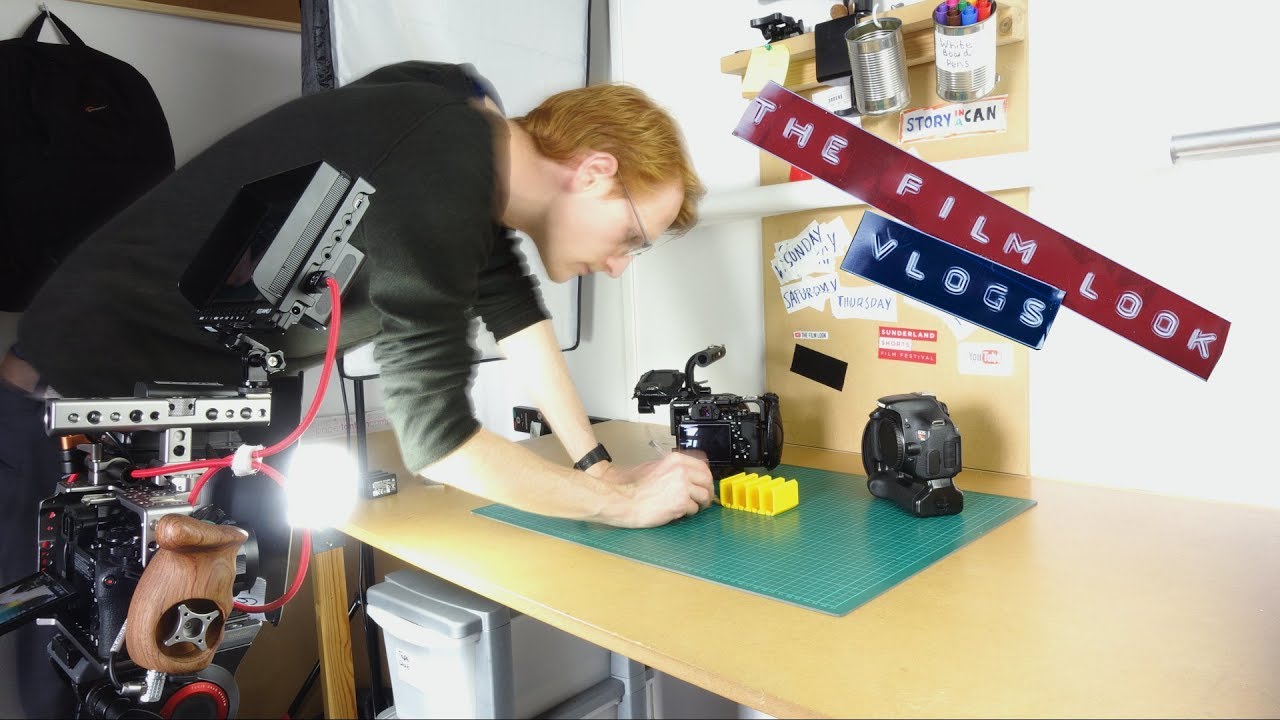
When you are looking in your camera bag for the battery clip, the bright yellow just stands out making easier to find since most other camera equipment is black.  

So go to Thingiverse and see what you can find that suits your camera equipment setup. There are loads of different battery holders, GoPro mounts, follow focus rings and you can even 3D print Lens Caps. I know I will be keeping an eye out for new camera equipment designs.

You can find links to all of the 3D designs below.

Mini Tripod: https://www.thingiverse.com/thing:1460181
Sony FW50 holder: https://www.thingiverse.com/thing:1094889
AA Battery Mount: https://www.thingiverse.com/thing:1720118
AA/AAA Battery Case: https://www.thingiverse.com/thing:51376
SD Card Organiser: https://www.thingiverse.com/thing:989624


This video was Sponsored By

http://bit.ly/corruption-pack - With glitchy overlays, distorted logo reveals and more, RocketStock’s "Corruption" is an ideal way to give your project a dramatic edge.

http://bit.ly/track-blue-blood - Click here to download this episode's track. Check out Premiumbeat.com to discover a huge range of exclusive royalty free music!


DISCLAIMERS:

Some of these links are affiliate links, if you purchase gear via these links The Film Look will receive a small commission, but there will be no additional cost to you. Thank you!

Story in a Can #7 | "Harry Potter Fan Film"

In each can there are 20 locations, 20 objects, 20 characters, and 20 scenarios. We pick one from each of the cans and try to come up with a film idea on the spot. Sometimes they are bad, but sometimes we turn the idea into a film.

In Story In a Can #9 Rob and Emily have to make a story about a Character who is a Bar Tender, a location of a Public Toilet, an object of a bottle of syrup, and a scenario of Audition?

Watch the video to see what story was made.


DISCLAIMERS:

Some of these links are affiliate links, if you purchase gear via these links The Film Look will receive a small commission, but there will be no additional cost to you. Thank you!

Map Flyover Title Sequence

When we made our short film Corpse we created this map flyover for the tile sequences at the start of the film. We did not actually use it in the film as we thought it was not needed, but wanted to show people how to create it.


This video was Sponsored By

http://bit.ly/pack-emulsion - Make your video look like it was tailor-made for the silver screen with RocketStock’s film grain overlay pack, Emulsion!

http://bit.ly/track-funkycarpet - Click here to download this episode's track. Check out Premiumbeat.com to discover a huge range of exclusive royalty free music!


Map Flyover Title Sequence.jpg

DISCLAIMERS:

Some of these links are affiliate links, if you purchase gear via these links The Film Look will receive a small commission, but there will be no additional cost to you. Thank you!

When you can't pay your Cast & Crew

When you are funding your own short films, it can sometimes be difficult to find the cash to pay your cast and crew a proper wage.

Instead we rely on volunteer filmmakers and actors. But, this doesn’t mean we can’t offer them something valuable for their time and effort. 

This is what you can do if you can’t pay your cast and crew. 

We aren’t professional filmmakers. Not in the traditional sense at least. We aren’t tied to a studio, we don’t have a budget, we don’t earn a wage from making movies.

We’re amateurs who fund our own short films because we love making them, and the cast and crew who are a part of those films are in the same boat. But this doesn’t mean we can’t offer back something valuable back to those who are helping out.

If you can’t afford to pay your actors, how can you re-pay them for volunteering their time?

Headshots are always a good choice. At our level, most of us are shooting on stills cameras in video mode. Headshots can be expensive for a struggling actor, so if you can shoot them free of charge, you’re on your way to paying back your debt!

DSC00011.jpg

If you want to go the extra mile, shoot a video monologue for them. It doesn't have to be over the top, but something sharp, well lit, and sounding good is a lot better than them shooting it on their phone. You never know, it might help them get their next job!

If they are volunteering in your film, give them a copy of it, without watermarks, for their showreel. In fact, offer to edit their showreel for them! Again, it doesn’t cost you anything but your time, which they gave up to help make your movie.

Paying-your-cast-and-crew

We make our own film posters too, so grab their signature for when they are famous, and print a copy for them to take home too.With crew, it’s a “I scratch your back” sort of deal. Again, if you can’t fork out the cash, make a note of what they sacrificed when they helped you; the hours they worked, the cost and distance of their travel, any kit they brought with them, and their value on set. When they need you, match their value.If you aren’t paying your cast and crew, you should make their time on your film as comfortable and as convenient as possible.

If they need to leave early, they leave early, don’t fight it.

If they can only start late, that's perfect, they start late and you get a few hours with them.

If they need a lift home and there is a car available, taxi them home.

Make their time helping you as simple as you can. Always work around them, not the other way around. If they have to go completely out of their way to help you, they might not bother next time you ask for assistance.

Best of all, feed people. Free food is great, and if you ask them what dietary habits they have beforehand, it's a lot easier to please them. Pizza is a staple student film cliche. But it's not always the best option, so find out what their favorite meal is, and grab the cook book.
When-you-can't-pay-your-Cast-&-Crew.jpg

And when you reach the stage when you CAN pay your cast and crew, remember those who did it for nothing, and maybe give them a call.


This video was Sponsored By

http://bit.ly/illuminate-pack - RocketStock’s light leak pack, "Illuminate", is sure to impress your viewers. Shot using digital cinema cameras in 4K, it’s an unbeatable way to lift your video to new, cinematic heights.

http://bit.ly/track-poolside - Click here to download this episode's track. Check out Premiumbeat.com to discover a huge range of exclusive royalty free music!


When you can't pay your Cast & Crew

DISCLAIMERS:

Some of these links are affiliate links, if you purchase gear via these links The Film Look will receive a small commission, but there will be no additional cost to you. Thank you!

Story in a Can #8 | "Hook & Crook" with Garth McCarthy!

In each can there are 20 locations, 20 objects, 20 characters, and 20 scenarios. We pick one from each of the cans and try to come up with a film idea on the spot. Sometimes they are bad, but sometimes we turn the idea into a film.

In Story In a Can #9 Rob and Emily have to make a story about a Character who is a funeral director, a location of a Cave, an object of a Shepherd's Crook, and a scenario of Get's fired from there job?

Watch the video to see what story was made.


DISCLAIMERS:

Some of these links are affiliate links, if you purchase gear via these links The Film Look will receive a small commission, but there will be no additional cost to you. Thank you!

Silence your Footsteps and Props

So it’s time to record dialogue for your next scene. But footsteps and prop noise keep getting into your dialogue takes. What can you do? This is your answer...neoprene and some double sided tape.

A video from our indie film sound guide is all about minimising noise so you can record clean dialogue whilst actors are delivering lines. Nothing is worse than a coffee cup clinking when someone is speaking because you can’t unbake those sound effects. I’ve put a link down below if you want to learn more.

So what can we do to prevent footstep noise from cast and crew and suppress the noise of props being handled during delivered dialogue?

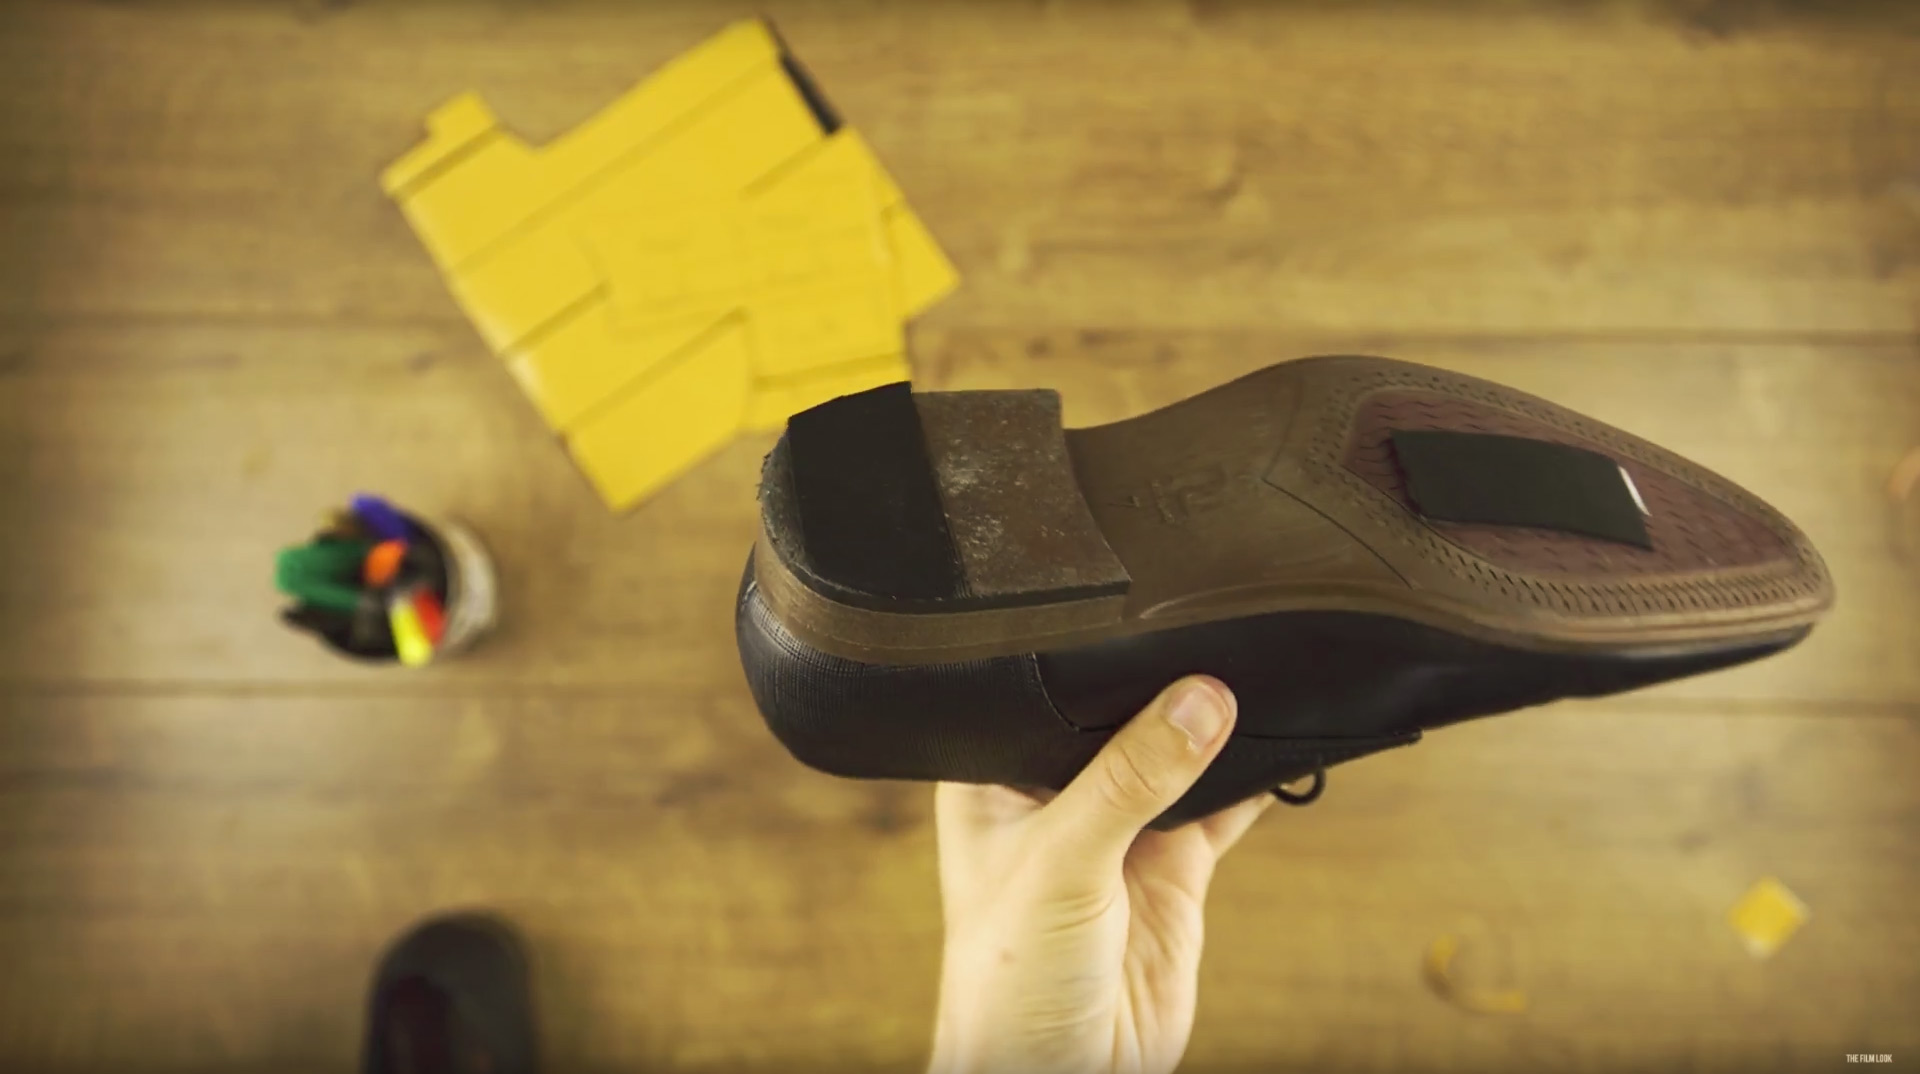
There is actually a product online called Hush Heels that do the trick. They are pre-cut selects of neoprene material that you can attach to the soles of the cast and crew’s footwear to dampen the noise of footsteps. Easy to use but they are a bit pricey as they only come in packs of 10 for £35.

This got me thinking. Surely neoprene isn’t that expensive! With a pair of scissors and some strong double sided tape, can we whip up some custom sized DIY noise pads?

I looked on ebay and found this A4 size sheet of neoprene for £3.05. Obviously, the bigger the piece you buy, the better value it gets. Together with some double sided sticky tape for £2.50 this has come to a total of £5.55. As we are only using 15% of the whole roll of tape, the cost of materials is closer to £3.43.

Now that we’ve got maths out of the way, let's see if they work!

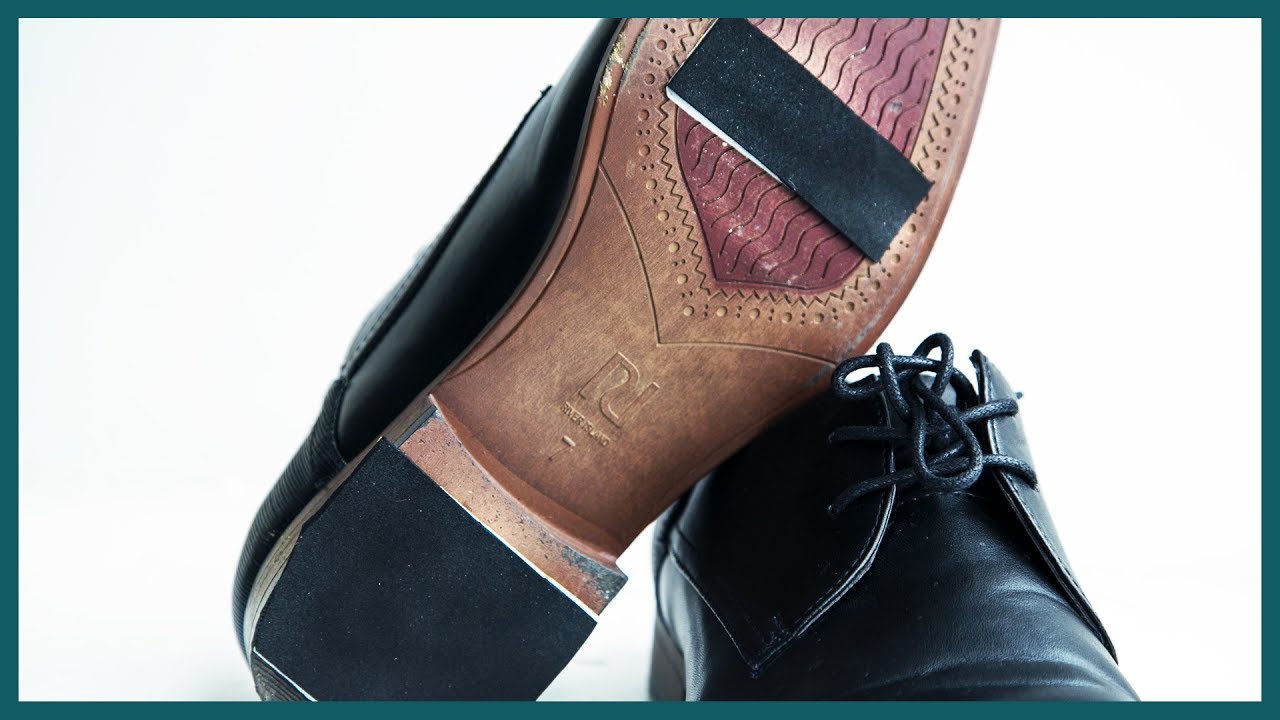
I taped over the back of the neoprene and drew out some templates based on one of Rob’s fancy shoes; for the heel and the ball of the foot as this is where the foot makes contact with the ground.

minimise-foot-steps

Rob is going to strut his stuff with and without the neoprene pads on a few different surfaces. I’ll place the Decibel metre on screen beside it so you can hear for yourself how well they work.

Obviously, they aren’t silent but they certainly make a difference. When the boom is aiming towards a person's mouth and not their feet, it’s going to be really quiet!

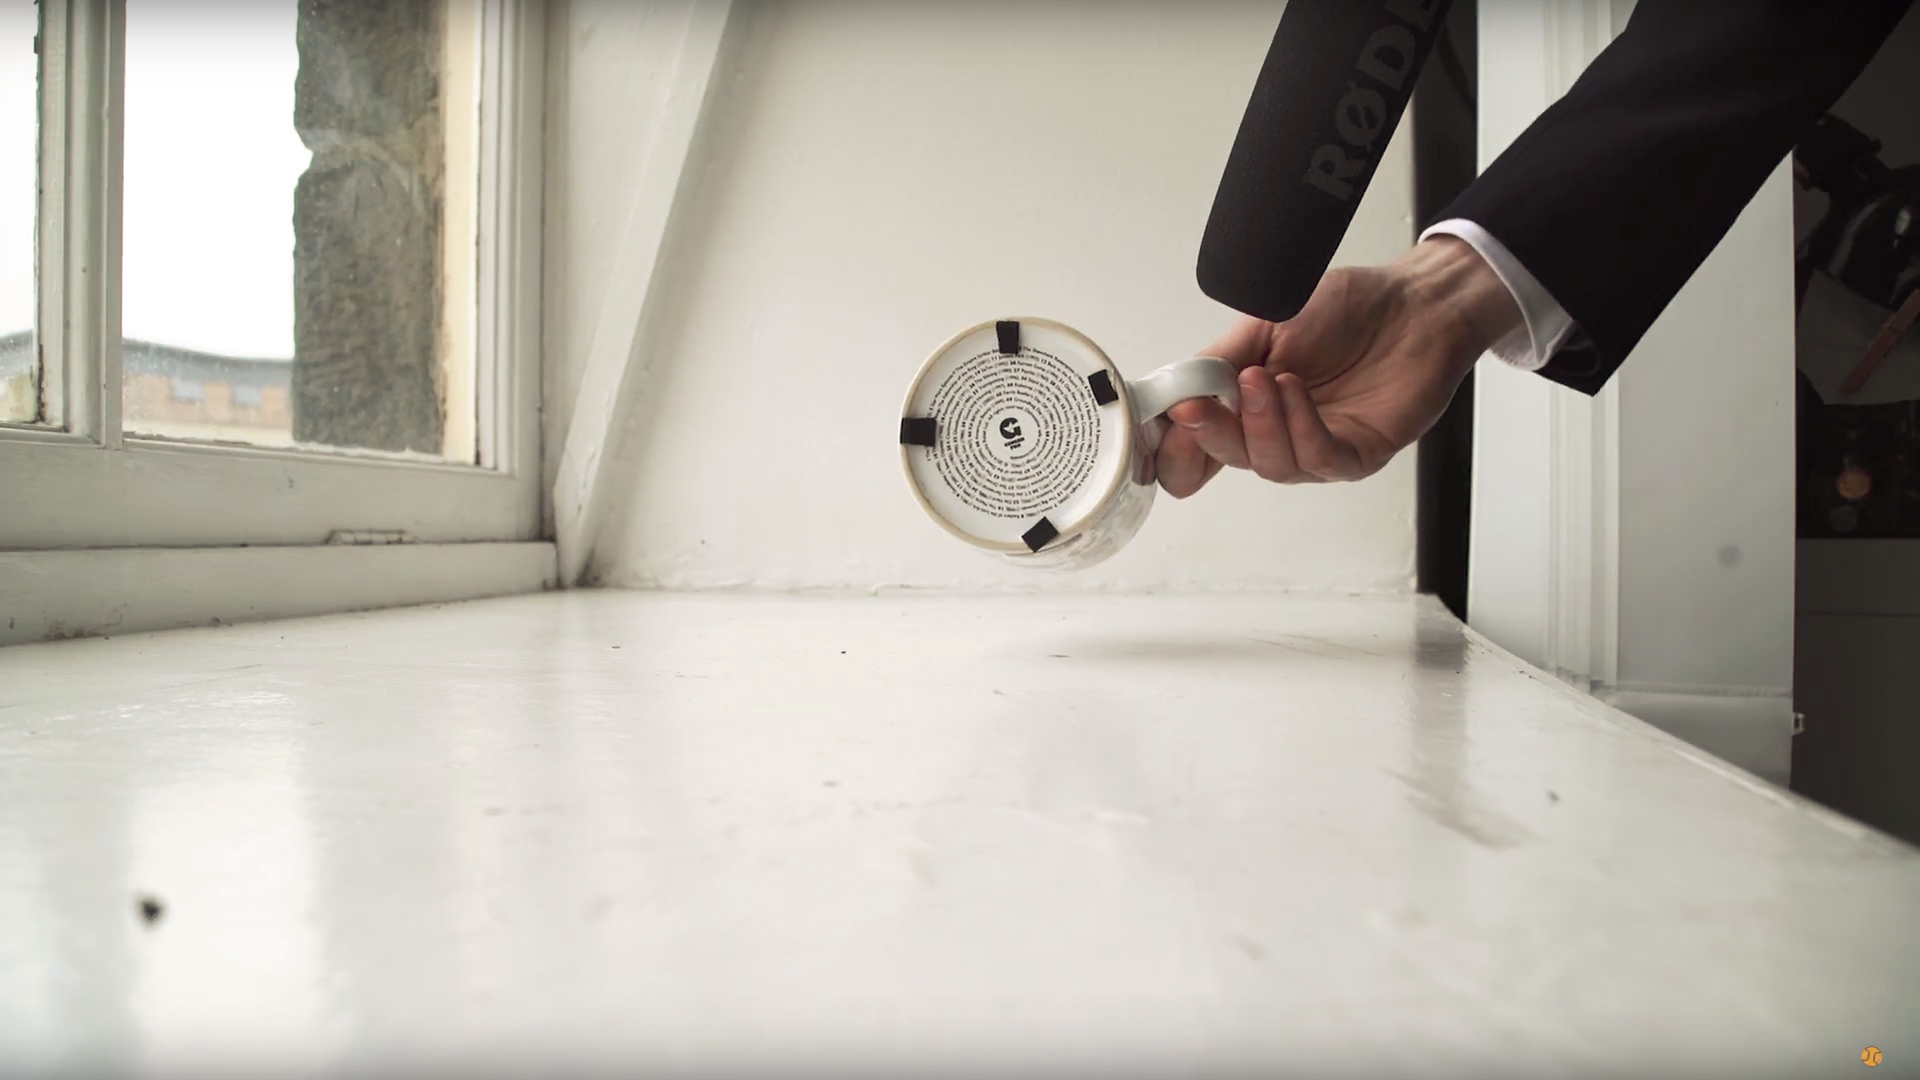
It works with props too.

  • Footage, cups, plates, and pans, with and without the neoprene pads.

Again, we are seeing a big difference in loudness which is ideal if you need a silent set to record super clean dialogue!

  • Footage, cups, plates, and pans, with and without the neoprene pads.

Silence-your-Props-With-Neoprene-Pads.jpg

They work if you need stealthy crew members too. Just add the neoprene pads to their feet and away you go!

The downside to our DIY method is the time is takes to prepare, cut, and unstick the bits from the back of the tape. It’s quite tricky to remove it, and this may waste precious time on set.  

If you need emergency pads of neoprene for the rare case of silencing footsteps and props, take the DIY method. You can always give the backing of the tape a dog-ear for easier peeling during the shoot.

But, if you’re a professional who needs a dozen pairs of heels hushed in just a few seconds, the professional option is probably better in the long run.


This video was Sponsored By

http://bit.ly/track-blue-blood - Thanks to PremiumBeat for providing the music for this week's episode. Check out Premiumbeat.com to discover a huge range of exclusive royalty free music!


Silence your Footsteps and Props

DISCLAIMERS:

Some of these links are affiliate links, if you purchase gear via these links The Film Look will receive a small commission, but there will be no additional cost to you. Thank you!

We are starting a Podcast! Vlog #36

For a while now we have been in talks about starting a Podcast that links with the YouTube channel. This week we finally bit the bullet and got ourselves a proper Podcast setup!


DISCLAIMERS:

Some of these links are affiliate links, if you purchase gear via these links The Film Look will receive a small commission, but there will be no additional cost to you. Thank you!